EIS/WSO2 Oauth2.0 For Google Federated Authentication
This blog post assumes that you already have a working instance of WSO2 IdentityService. I will also assume that you have a google domain. However if you have no problem asking for permission from your students then you don’t need to do even that. While this is a general guide, as it applies to anyone with a google account and a WSO2 Identity Server, it was developed specifically as a Single-Sign On tool for Ellucian Banner SSOManager to allow authentication to all of WebTailor and Internet Native Banner Forms.
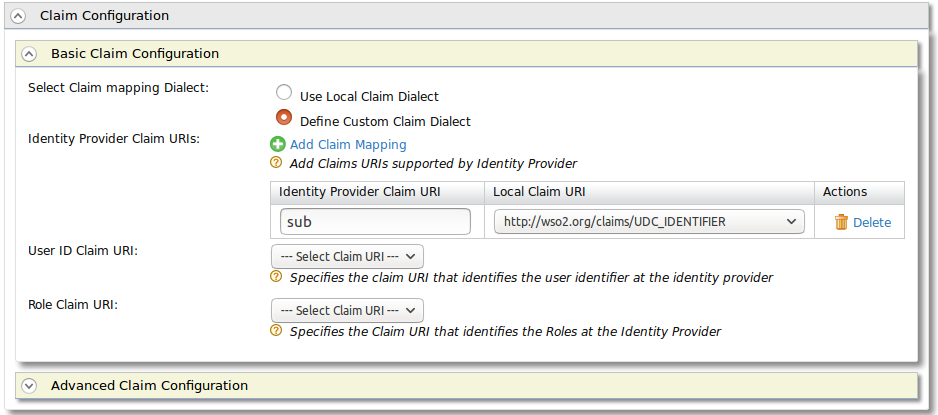
Log into the WSO2 Identiy Server and We need to configure a custom claim. I selected the http://wso2.org/claims schema. Click Add New Claim Mapping. I created one called UDC_IDENTIFIER. It is supported by Default and Read-Only. We are not utilizing this to provision our accounts. This is mapped to uid for our ldap, which is not applicative or necessary for what follows. Merely that it exists so that we can do a custom mapping.
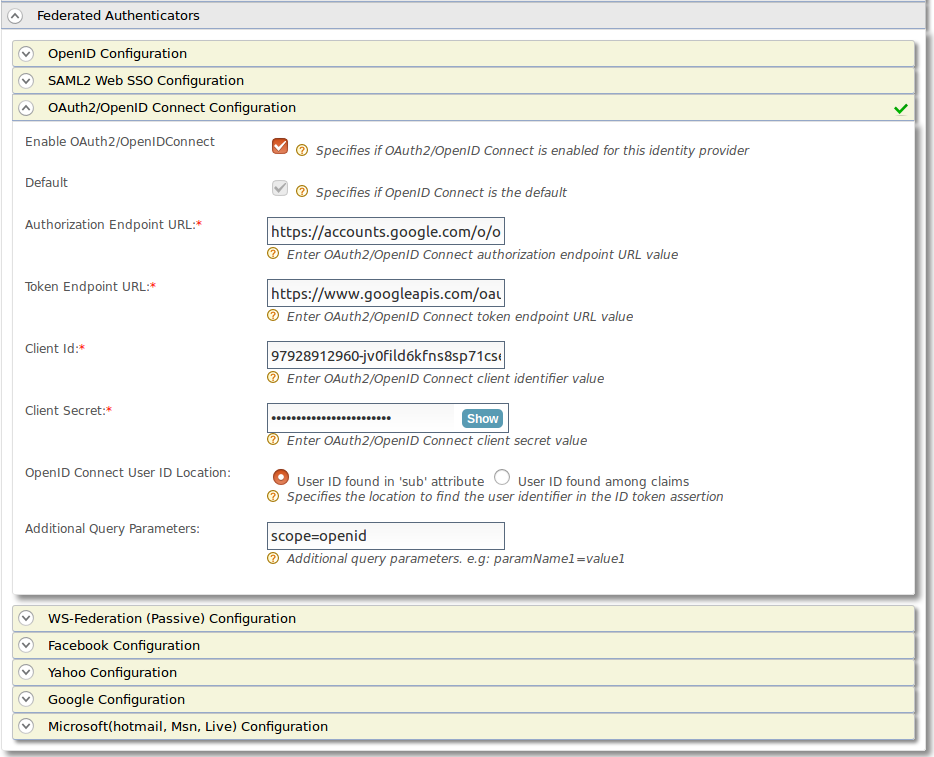
Next we need to navigate to Google to do some setup from the other end. Create an Admin Account that will be responsible for your application. It is important that it is an admin so that he will have access to the Admin Directory API from google (This same API helps you automate google which we can expand on in later posts). Navigate to the Google Developer Console and Create a New Application. Navigate to the Admin SDK and make sure that it is enabled. Finally navigate back to the Admin Panel for your domain and grant access to basic user information to the oauth account.(This is optional but without it you will have to ask for permission from your users.) From the Admin Console, go to Security, Advanced Settings, Manage API client access, then map your Oath2.0 client ID to the scope https://www.googleapis.com/auth/plus.me
Now armed with your Application Secret, a User Account, and an Oath2.0 Client Id we need to navigate back to the WSO2 Identity Server. We map the sub claim that google provides which is a unique value for each google account. We map this in our database to a PIDM. This allows us to provide accurate access for any Application.The other fields are given to you from the developer api.
Authorization Endpoint URL - https://accounts.google.com/o/oauth2/v2/auth
Token Endpoint URL - https://www.googleapis.com/oauth2/v4/token
Additional Query Parameters = scope=openid
Here Are our configs
There you go. You are done. However its not very useful without actually doing something. In order for us to connect it to main applications we need to have that unique identifier mapping. We have a more complex system to make sure we are mapping the correct email accounts. You can find the current code here The important endpoint is that I new have the unique google account id in GOBUMAP mapped to the pidm. I will further expand on my scala api later. It is not for this post.
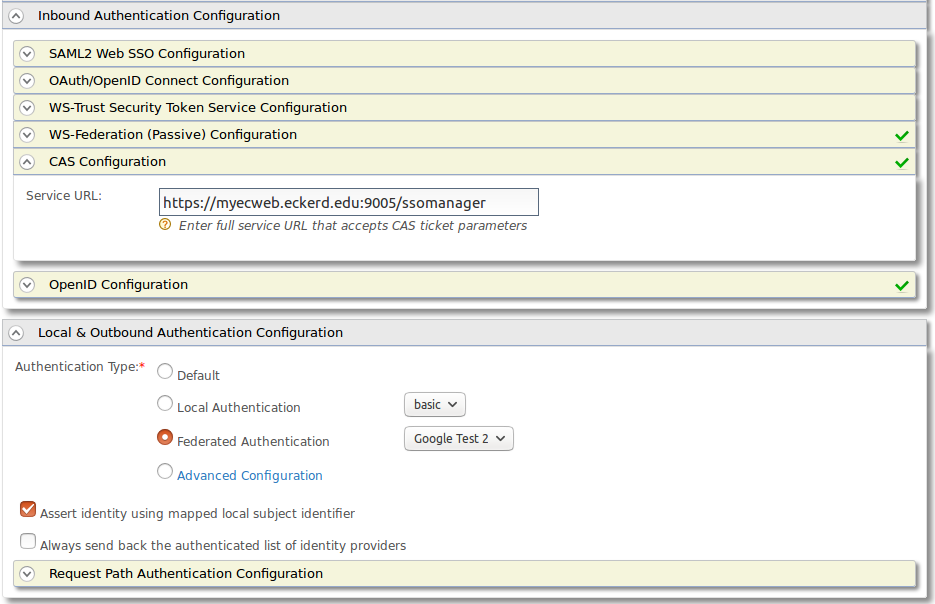
Now for SSOManager we need to create a CAS endpoint that maps all of the information to our applications that we can cover in another post if there is interest. The endpoint expects a claim called UDC_IDENTIFIER so that is what we give it. Then we use our Authentication to google as the backend and send the tickets to the appropriate endpoint. Assert identity with the mapped local subject identifier so that we are now existing as that id that we have mapped in the GOBUMAP table.

Now all you have to do is have the SSOManager in place to receive the tickets.
Feel free to email or contact me on ECommunities with any questions you might have.